


Looking for a suitable motor?


小编
Published2025-10-15
Introduction to Servo Motors and Setting Up Your Arduino Project
In the world of robotics, automation, and electronics, servo motors are incredibly popular. Whether you're building a robot arm, a mechanical project, or just want to understand how motors work with Arduino, a servo motor is a great place to start. In this article, we will explore how to control a servo motor using an Arduino board. You don’t need any prior experience with servos or Arduino to get started, just follow along, and you’ll be able to operate a servo motor in no time.
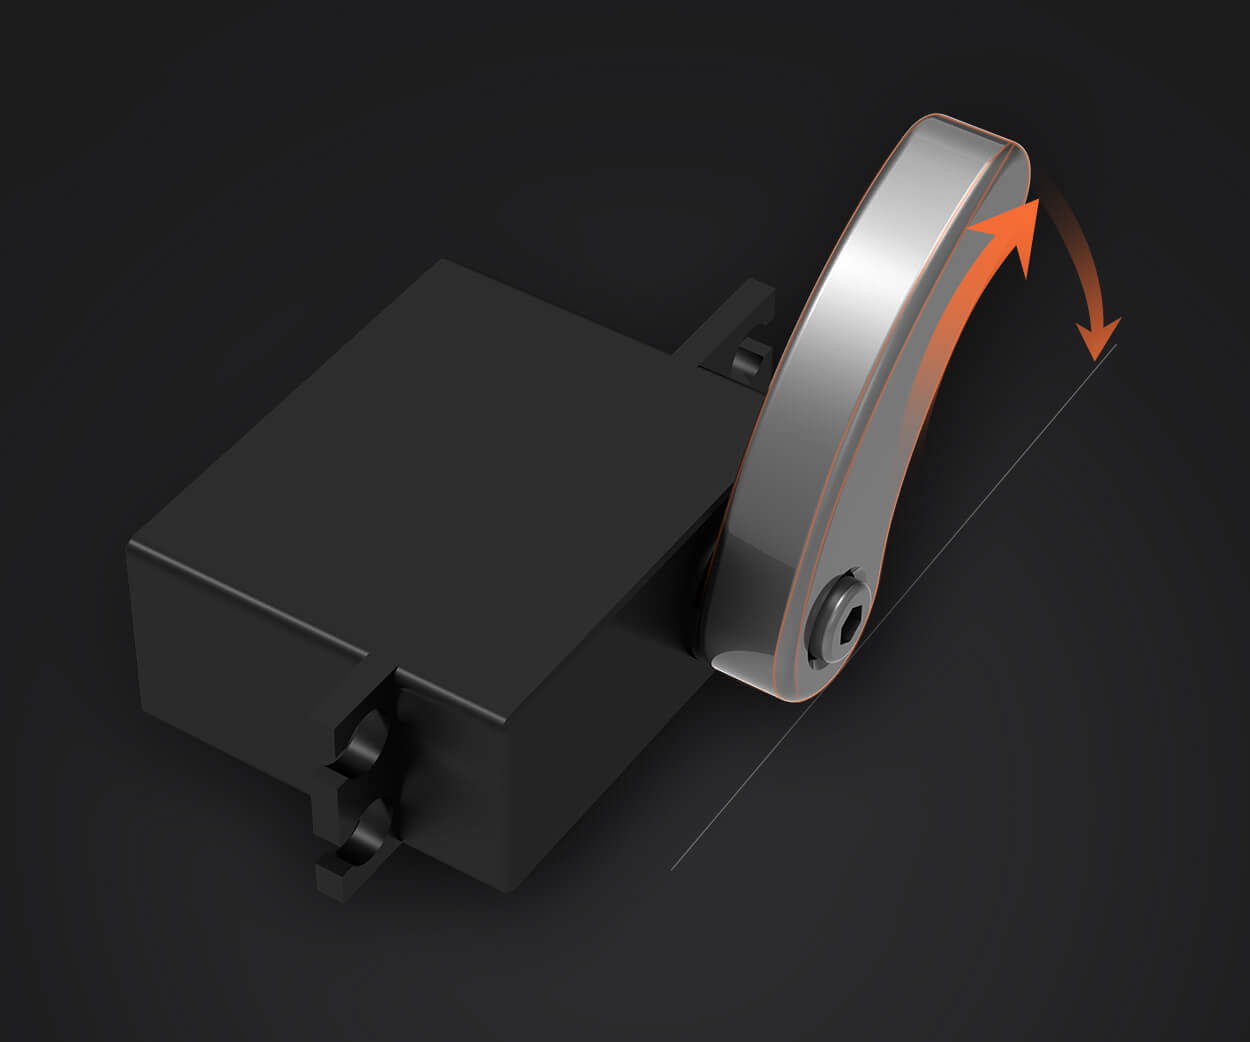
A servo motor is a type of motor that is capable of precise control over angular position. Unlike regular DC motors that continuously spin when powered, servo motors have a built-in control system that allows them to rotate to a specific angle, typically between 0 and 180 degrees, and then hold that position. This makes them perfect for tasks that require accuracy, such as controlling the position of a robotic arm, moving a camera, or adjusting an antenna.
There are many types of servo motors, but for beginners, a standard hobby servo is the most common choice. These servos are small, lightweight, and inexpensive, making them an ideal starting point for Arduino projects.
Essential Components Needed
To control a servo motor with an Arduino, you’ll need the following components:
Arduino Board: An Arduino Uno or any other compatible board.
Servo Motor: A typical hobby servo motor.
Jumper Wires: For connecting your servo to the Arduino.
Breadboard: Optional, but useful for organizing connections.
External Power Supply: (if needed for larger servos).
Once you have these components, you are ready to start wiring your circuit.
Wiring the Servo Motor to Arduino
Connecting a servo motor to the Arduino is simple and doesn’t require any complex circuitry. Follow these steps to wire your servo motor to the Arduino board:
Connect the Power (Red Wire): The red wire of the servo motor connects to the 5V pin on the Arduino. If you're using a larger servo that requires more power, you may want to use an external power supply. However, for smaller servos, the 5V pin on the Arduino should be sufficient.
Connect the Ground (Black or Brown Wire): The black or brown wire of the servo motor goes to the GND (ground) pin on the Arduino. This ensures that the circuit has a common ground.
Connect the Signal (Yellow or Orange Wire): The signal wire, which is usually yellow or orange, connects to one of the PWM pins on the Arduino. For example, you can connect it to pin 9. This pin will be used to send signals to the servo, telling it what position to move to.
Once you’ve completed the wiring, you should have three connections: power, ground, and signal.
Writing the Arduino Code to Control the Servo
Now that your servo is physically connected to the Arduino, it’s time to write some code to control it. The Arduino IDE has a built-in library called Servo.h, which simplifies the process of controlling servo motors. The library provides easy-to-use functions like write() to set the angle of the servo.
Here’s a simple example of Arduino code that makes the servo move between 0 and 180 degrees:
#include // Include the Servo library
Servo myServo; // Create a Servo object
myServo.attach(9); // Attach the servo to pin 9
myServo.write(0); // Move the servo to 0 degrees
delay(1000); // Wait for 1 second
myServo.write(180); // Move the servo to 180 degrees
delay(1000); // Wait for 1 second
#include : This line tells the Arduino to include the Servo library, which provides the necessary functions to control the servo.
Servo myServo;: This creates a Servo object named myServo.
myServo.attach(9);: This attaches the servo motor to pin 9 on the Arduino. Make sure that the servo signal wire is connected to this pin.
myServo.write(0);: This command tells the servo to move to 0 degrees.
delay(1000);: This pauses the program for 1000 milliseconds (or 1 second).
myServo.write(180);: This moves the servo to 180 degrees.
delay(1000);: Again, we pause for 1 second.
When you upload this code to your Arduino, the servo will alternate between 0 and 180 degrees every second.
Advanced Techniques and Troubleshooting
Fine-Tuning the Servo Motor’s Movement
In many cases, you may need more precise control over the servo motor. While the basic code moves the servo between 0 and 180 degrees, you can set the servo to any angle between 0 and 180, allowing for greater flexibility in your projects. For instance, you could use the following code to move the servo to a specific angle based on user input:
myServo.attach(9); // Attach the servo to pin 9
int angle = analogRead(A0); // Read the analog input from pin A0
angle = map(angle, 0, 1023, 0, 180); // Map the input to the range 0-180
myServo.write(angle); // Move the servo to the specified angle
delay(15); // Wait for the servo to reach the position
In this case, the servo’s position is controlled by an analog input, like a potentiometer. This allows you to dynamically adjust the servo’s angle in real-time. The analogRead(A0) function reads the value from the analog pin, and map() converts this value into a range between 0 and 180, which is the valid range for the servo motor.
Troubleshooting Common Servo Issues
Sometimes, you might run into problems when working with servo motors. Here are some common issues and how to troubleshoot them:
Servo Not Moving: If your servo doesn’t move when you upload the code, double-check the wiring. Ensure that the signal wire is connected to the correct PWM pin and that power and ground are properly connected. Also, ensure that your servo is rated for 5V, as some larger servos may require a higher voltage.
Servo Moves Erratically: If the servo moves unpredictably or jittery, this can be a sign of insufficient power. Servo motors can draw significant current, especially under load, so consider using an external power supply instead of relying on the Arduino’s 5V pin.
Servo Stalls or Overheats: If the servo stalls or gets hot, it could be under too much load. Make sure the servo isn’t trying to move too far or under too much resistance. If the servo is intended for small movements, make sure you're not asking it to rotate 180 degrees too quickly or for too long.
Servo Not Reaching Desired Position: If the servo doesn’t reach its intended position, check the power supply and ensure the servo is correctly calibrated. Some servos have a limited range (e.g., 170 degrees instead of 180), so make sure you’re not exceeding that range in your code.
Once you’ve mastered the basics of controlling a servo motor with Arduino, there are endless possibilities for extending your project. Here are a few ideas:
Robotic Arm: Use multiple servos to build a robotic arm. You can control each joint of the arm with a different servo motor.
Pan-and-Tilt Camera: Attach a camera or sensor to a servo-controlled mount. This allows you to move the camera or sensor in multiple directions.
Servo Motor with Sensors: Combine a servo motor with distance sensors, temperature sensors, or light sensors to create a reactive system that adjusts based on its environment.
Controlling a servo motor with Arduino is an exciting and rewarding project for beginners and seasoned makers alike. With just a few simple components and some basic coding, you can bring motion to your creations and learn valuable skills in the process. From basic movements to more advanced applications, servo motors open up a world of possibilities for your Arduino projects. So, grab your servo motor, write some code, and start experimenting today!
Leveraging innovations in modular drive technology, Kpower integrates high-performance motors, precision reducers, and multi-protocol control systems to provide efficient and customized smart drive system solutions.
Update:2025-10-15
Contact Kpower's product specialist to recommend suitable motor or gearbox for your product.


