


Looking for a suitable motor?


小编
Published2025-10-15
Introduction to Servo Motors and Their Importance
Servo motors are essential components in various applications, from robotics and automation to industrial machinery. Their ability to provide precise motion control, high torque, and accuracy makes them invaluable in precision tasks. However, ensuring that a servo motor operates efficiently requires proper wiring and connection. Incorrect connections can lead to performance issues, overheating, or even permanent damage to the motor. In this guide, we will explore the best practices for wiring a servo motor and ensuring that it functions at its full potential.
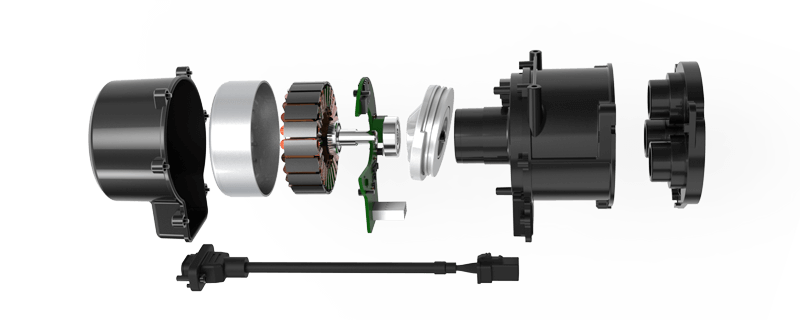
Before diving into the specifics of the wire connection, let’s first understand the core elements of a servo motor. Typically, a servo motor consists of three main components: the motor, the controller, and the feedback device (encoder). The motor converts electrical energy into mechanical motion, while the controller interprets input signals and directs the motor’s action. The feedback device provides real-time data about the motor's position, speed, and other operational parameters, ensuring smooth and accurate movement.
The Importance of Proper Wire Connection
A servo motor’s wiring is crucial because it carries the electrical signals that control the motor's movements. It also powers the motor, enabling it to function correctly. Proper wire connections ensure the motor receives the correct signals from the controller, making it essential for achieving the desired performance. Here are some of the main reasons why correct wiring matters:
Optimal Performance: Proper connections ensure that the servo motor operates at the intended speed and torque.
Safety: Incorrect wiring can lead to electrical faults, which may cause overheating, short circuits, or even fire hazards.
Longevity: A well-connected servo motor will run more efficiently, reducing wear and tear and extending its lifespan.
Accuracy: Servo motors are often used in applications where precision is paramount. Accurate wiring ensures the feedback system works correctly, leading to better motion control.
Understanding the Basic Wiring Components
Before you start wiring your servo motor, it’s essential to understand the basic components involved. Most servo motors have three main wire connections:
Power Supply (Vcc): This wire provides the necessary voltage to the motor. Typically, this is connected to a power source that matches the servo motor's voltage requirement (commonly 5V, 12V, or 24V depending on the motor).
Ground (GND): The ground wire completes the electrical circuit and returns the current back to the power supply. It is a crucial part of ensuring stable operation.
Signal (PWM): The signal wire carries the pulse-width modulation (PWM) signal that instructs the motor to move to a specific position or speed. This signal is typically generated by a microcontroller or a servo controller.
Step-by-Step Guide for Servo Motor Wire Connection
Now that we understand the basic wiring components, let’s look at the step-by-step process of connecting a servo motor.
Step 1: Gather the Necessary Equipment
Before you begin, ensure that you have all the necessary tools and equipment, including:
A compatible controller (e.g., Arduino, Raspberry Pi, or dedicated servo driver)
Power supply with the correct voltage for the motor
Wiring tools (screwdriver, wire cutters, etc.)
Step 2: Identify the Wires on Your Servo Motor
Most servo motors come with three wires, typically color-coded. However, the exact colors may vary depending on the manufacturer. The most common color scheme is:
Black or Brown: Ground (GND)
Yellow or White: Signal (PWM)
Make sure to verify the wire functions with the manufacturer's documentation if the color codes are not standardized.
Step 3: Connect the Power and Ground Wires
Start by connecting the power (Vcc) and ground (GND) wires to the corresponding terminals on your power supply or controller. Ensure that the voltage matches the servo motor’s specifications. For example, a 5V servo motor should be connected to a 5V power source.
Next, connect the ground wire from the servo to the ground (GND) pin of the controller or power supply. This is critical for completing the circuit and preventing issues like fluctuating signals or voltage spikes.
Step 4: Attach the Signal Wire
The signal wire carries the PWM signal that dictates the servo motor's position. Connect the signal wire from the servo to the designated PWM output pin on your controller or driver board. For example, if you are using an Arduino, the PWM pin on the board will typically be marked as "D3" or "D9."
Step 5: Test the Connections
After wiring the motor, test the system by running the controller. Check that the servo motor responds as expected—moving to different positions based on the PWM signal. If the motor is not responding or behaving erratically, double-check the wiring connections, particularly the signal wire, as it is the most sensitive to errors.
Common Wiring Mistakes to Avoid
While wiring a servo motor might seem straightforward, there are a few common mistakes that can cause issues:
Incorrect Voltage: Always ensure that the voltage of your power supply matches the specifications of the servo motor. Overvoltage or undervoltage can cause malfunction or damage.
Loose Connections: A loose wire can lead to poor performance or intermittent operation. Make sure all connections are secure.
Wrong PWM Frequency: If the PWM frequency is too high or too low, the motor may not respond as expected. Refer to the motor’s datasheet for the correct frequency range.
Overloading the Power Supply: Ensure that the power supply can handle the current required by the servo motor, especially if you're running multiple motors.
Troubleshooting Common Servo Motor Wiring Issues
Even with careful installation, issues may still arise in servo motor connections. Here are some common problems and how to address them.
Servo Motor Not Moving or Responding
This issue is usually caused by incorrect wiring, insufficient power supply, or improper signal generation. Here’s how to troubleshoot:
Check Power Supply: Ensure that the power supply is delivering the correct voltage and can handle the motor’s current requirements.
Verify Signal Connection: Make sure the signal wire is correctly connected to the PWM output pin. Also, confirm that the PWM signal is active and operating within the required frequency range.
Test with Another Servo: If possible, try another servo motor to rule out any issues with the motor itself.
Erratic Movement or Jittering
If the servo motor is behaving erratically, there could be an issue with the PWM signal.
Check PWM Signal Frequency: If the frequency of the PWM signal is incorrect, the motor may not move smoothly. Double-check the frequency settings in your controller.
Power Supply Issues: A fluctuating power supply can also cause jittery movements. Ensure that the power supply is stable and sufficient for the motor.
If the motor is overheating, it may be due to several factors:
Excessive Load: Ensure that the motor isn’t being asked to move a load beyond its rated capacity.
Inadequate Cooling: In some cases, adding a heatsink or a fan can help keep the motor cool during extended operation.
Continuous Operation: Some servo motors are designed for intermittent use, not continuous running. Check the motor's specifications for the recommended duty cycle.
Motor Stops Working Completely
If the motor stops functioning altogether, it could be due to several factors, such as:
Faulty Wiring: Ensure that all wiring connections are intact and that there are no broken or disconnected wires.
Damaged Servo: If the servo motor is damaged or burned out, it may need to be replaced.
Incorrect Power Supply: If the power supply was not sufficient or delivered incorrect voltage, it could damage the motor. Check the motor’s specifications and verify that the power supply matches.
Correctly wiring a servo motor is essential for ensuring its optimal performance, longevity, and safety. By following the steps outlined in this guide and avoiding common mistakes, you can ensure that your servo motor functions efficiently and effectively. Whether you're building a robotic arm, automating machinery, or creating a motion control system, a properly wired servo motor is crucial to achieving smooth, precise movements.
Understanding the basic wiring components, following the right procedure, and troubleshooting effectively will help you get the most out of your servo motor and enjoy reliable performance.
Leveraging innovations in modular drive technology, Kpower integrates high-performance motors, precision reducers, and multi-protocol control systems to provide efficient and customized smart drive system solutions.
Update:2025-10-15
Contact Kpower's product specialist to recommend suitable motor or gearbox for your product.


