


Looking for a suitable motor?


小编
Published2025-10-15
Imagine a tiny yet powerful brain that can breathe life into your ideas—welcome to the world of Arduino Nano. Compact, versatile, and incredibly accessible, the Arduino Nano has become a staple in DIY electronics and robotics projects. Coupled with servo motors, it opens a universe of possibilities, from simple robotic arms to intricate animatronic displays. If you've ever wondered how to bring motion to your electronic projects, understanding the fundamental coding and control methods for servo motors with an Arduino Nano is your first step.
The Arduino Nano is a small, breadboard-friendly microcontroller based on the ATmega328P chip, offering an impressive blend of performance and size. It's perfect for projects where space is limited yet demands robust performance. Its pin configuration allows for easy connection to sensors, LEDs, motors, and other devices, making it a favorite among makers. Among these peripherals, servo motors stand out due to their simplicity and effectiveness at precise position control. They’re integral to robotics, camera gimbals, remote-controlled vehicles, and artistic installations.
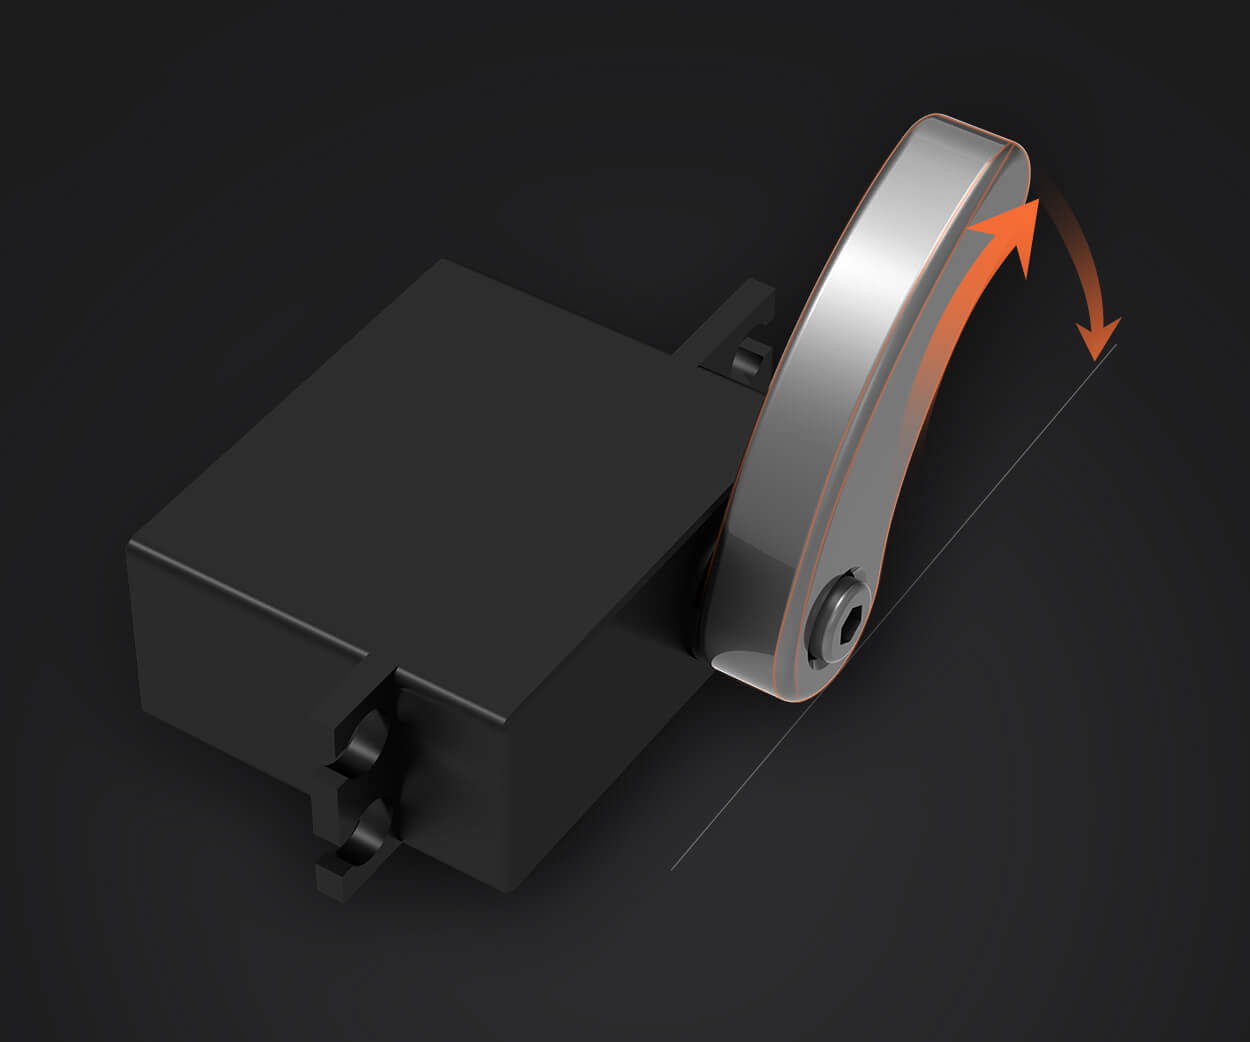
Controlling a servo motor with the Arduino Nano is surprisingly straightforward, yet it offers ample room for creativity and complexity. The key is understanding how PWM (Pulse Width Modulation) signals influence the servo's position. Simply put, by sending a PWM signal with varying pulse widths, you tell the servo how far to rotate—usually within a range of 0 to 180 degrees.
Getting started involves a few basic components: the Arduino Nano board, a servo motor, a suitable power source, and some jumper wires. It’s crucial to note that servos draw more current than an Arduino pin can safely supply, so an external power supply is often recommended to prevent damage to your board.
Here’s a simple schematic: connect the servo's power (usually red) to the positive terminal of your power supply, the ground (black or brown) to the negative terminal, and the control wire (usually white or yellow) to a specific digital pin on the Arduino Nano. For beginners, pin D9 is often used for its compatibility with the Servo library, which simplifies code.
Once your hardware is set, you can write your first code snippet. The Arduino IDE comes with a built-in Servo library, making your coding experience smoother. A minimal example would be to include the Servo library, create a servo object, attach it to the chosen pin, and then command it to move to different positions using the write() function.
#include Servo myServo; void setup() { myServo.attach(9); // Attach servo to pin 9 } void loop() { myServo.write(0); // Move to 0 degrees delay(1000); // Wait for a second myServo.write(90); // Move to 90 degrees delay(1000); myServo.write(180); // Move to 180 degrees delay(1000); }
This simple code makes the servo sweep through three positions, which is perfect for initial testing. As you gain confidence, you can implement more complex control algorithms, incorporate sensors for feedback, or even set up this configuration in a larger robotic system.
A key point to remember is calibration—each servo has its own torque and turning limits. Some servos might not reach full 180 degrees or might have a slight offset. Testing your servo's range before deploying it into a project can save frustration later. Also, be cautious with power; servos stalled under load draw current which could cause voltage drops or damage if not properly managed.
Beyond basic movement, coding enables you to develop smooth, synchronized operations. For projects like robotic arms, you might want multiple servos working together to position an end effector precisely. This involves coordinating multiple servo write commands in a loop or using complex algorithms for smooth transitions. Utilizing sensors, such as potentiometers, can provide feedback to fine-tune movement, creating more interactive and accurate systems.
But what if you want to build something more dynamic, like an automated camera slider or a fighting robot? The principles remain the same but scaled up with added components, sensors, and perhaps wireless control modules. Integrating Bluetooth or Wi-Fi modules with the Arduino Nano extends your project to smartphone control, remote interactions, and IoT applications.
In summary, mastering servo motor control via Arduino Nano is not just about learning a programming syntax; it’s about unlocking a toolkit for innovative creation. The process involves understanding hardware connections, mastering simple code snippets, and gradually exploring complex applications. Whether you’re a hobbyist, student, or seasoned developer, controlling servo motors with the Arduino Nano offers a rewarding experience with countless applications.
Stay tuned for the second part, where we’ll dive deeper into sophisticated control techniques, troubleshooting tips, and inspiring project ideas that leverage the full potential of Arduino Nano and servo motors. From creating robotic limbs to interactive art, the possibilities are limited only by your imagination.
Building upon the basics from Part 1, let's explore more advanced control techniques that can enable your projects to become truly intelligent and responsive. One of the exciting avenues is implementing PWM for smoother, more refined movements, and integrating sensors for feedback-controlled operations. Additionally, we'll delve into some practical troubleshooting strategies and showcase inspiring project ideas that highlight the versatility of Arduino Nano with servo motors.
Enhanced Control with Pulse Width Modulation
While the straightforward use of the write() function sets servo positions directly, more refined control can be achieved through pulse width modulation (PWM). PWM allows for variable speed control in motor applications and more nuanced positioning in servos. By adjusting the duration of the high pulse within the PWM signal, you can make servo movements more smooth and natural, especially in applications like camera gimbals or robotic arms where abrupt movements may be undesirable.
The Arduino's analogWrite() function is typically used for PWM on PWM-capable pins, but with servos, the write() method is specialized for position control. However, by using the writeMicroseconds() method, you can specify precise pulse durations, giving you finer control—most servos accept pulse widths between 1000 and 2000 microseconds, corresponding roughly to 0° to 180° positions.
myServo.writeMicroseconds(1500); // Sets servo to neutral position delay(1000); myServo.writeMicroseconds(1300); // Slight shift to one side delay(1000);
Tuning these microsecond values allows you to achieve more fluid, graceful movements tailored to your specific servo’s characteristics.
Sensor-Integrated Control for Feedback Loops
One of the most powerful enhancements is integrating sensors for feedback control. A common setup includes using potentiometers attached to the servo's shaft or external sensors like ultrasonic distance sensors, infrared sensors, or encoders. These sensors provide real-time data, enabling your system to adjust servo positions dynamically, resulting in more adaptive and intelligent behavior.
For example, a simple robotic gripper can use a potentiometer to measure the angle of the arm, ensuring precise positioning. Similarly, an automated pet feeder could use weight sensors to dispense the correct amount of food. Feedback control allows for error correction and more nuanced control, transforming basic servo commands into intelligent, autonomous systems.
Implementing sensor feedback involves reading sensor values within your program, processing the data, and then adjusting servo positions accordingly. Here's a basic outline:
#include Servo myServo; int sensorPin = A0; // Analog input pin for potentiometer int sensorValue = 0; void setup() { myServo.attach(9); Serial.begin(9600); } void loop() { sensorValue = analogRead(sensorPin); int servoPos = map(sensorValue, 0, 1023, 0, 180); // Map sensor value to servo angle myServo.write(servoPos); Serial.print("Sensor: "); Serial.print(sensorValue); Serial.print(" - Servo: "); Serial.println(servoPos); delay(15); // Small delay for smoother movement }
This simple program reads a potentiometer, converts its value to a servo angle, and updates the position in real-time, creating a responsive control system.
Advanced Projects and Inspiration
Beyond simple movement, your creative potential is vast. Using multiple servos synchronized with sensors and control algorithms, you can build:
Robotic arms: Combining multiple servo joints for complex articulation, useful in automation and hobby robotics. Animatronic figures: Bringing characters to life with synchronized limb and head movements. Pan-and-tilt camera systems: Achieving smooth, automated tracking of objects or scenes. Dynamic light displays: Using servos to rotate visual elements or switches in artistic installations.
For these projects, consider writing functions to encapsulate movement sequences, or use libraries like AccelStepper for more advanced motion planning. Incorporate timers, conditional logic, or wireless modules like Bluetooth (HC-05) to enable remote control.
Troubleshooting Common Issues
Despite its simplicity, beginners often face hurdles:
Servo jitter: Caused by signal noise or power issues. Use a dedicated power supply and keep grounds common. Servo motor overheating or stalling: Ensure you're not commanding movements beyond the servo’s physical limits or causing excessive load. Unresponsive movement: Check wiring connections, ensure correct pin assignments, and verify the code uploads correctly. Overcurrent or voltage dips: Use a separate power supply capable of providing sufficient current, especially with multiple servos.
Powering servos can be tricky; they often demand more current than the Arduino's 5V pin can provide. A common solution is:
Use an external power source (e.g., a 6V or 7.4V LiPo battery pack). Connect the power directly to the servo power and ground lines. Connect the grounds to the Arduino ground to complete the circuit. Use a capacitor (e.g., 470μF or higher) across the servo power lines to smooth voltage fluctuations and filter noise.
Final Thoughts: Creativity without Limits
Once you've mastered the basics, the real fun begins. How about combining your servo control with machine learning? Or creating a voice-activated robot? Or designing a kinetic sculpture responsive to its environment? The intersection of hardware and software via Arduino Nano and servos is a playground that rewards experimentation.
As you push your projects further, consider exploring other components like sensors, wireless modules, and different types of motors. Innovate, iterate, and don't be afraid to break or reinvent your designs. Often, the most inspiring projects emerge from unexpected failures and bold experiments.
In closing, the ability to control servo motors with Arduino Nano is more than a technical skill—it's an invitation to craft interactive, dynamic, and intelligent creations. Whether you're automating a simple task or building the centerpiece of an artistic installation, this knowledge equips you to turn ideas into reality. So plug in your servo, upload your code, and start bringing your visions to life—there's a whole world of motion waiting to be created.
Leveraging innovations in modular drive technology, Kpower integrates high-performance motors, precision reducers, and multi-protocol control systems to provide efficient and customized smart drive system solutions.
Update:2025-10-15
Contact Kpower's product specialist to recommend suitable motor or gearbox for your product.


