


Looking for a suitable motor?


小编
Published2025-10-15
Certainly! Here is the first part of an engaging, soft-style article on "servo motor pinout," formatted as requested:
Imagine for a moment the endless possibilities that servo motors unlock in robotics, remote-controlled vehicles, and automation projects. These tiny but mighty devices serve as the backbone of countless innovations, translating electrical signals into precise mechanical movements. Yet, beneath their compact exterior lies a crucial piece of knowledge that can make or break your project: understanding the servo motor pinout.
Think of the pinout as the secret map guiding you through the motor's wiring landscape. Just like the keys to a treasure chest, knowing how each pin functions ensures smooth operation and helps you unlock your projects’ full potential. Whether you're connecting a servo to your Arduino, Raspberry Pi, or other microcontrollers, understanding the wiring is essential.
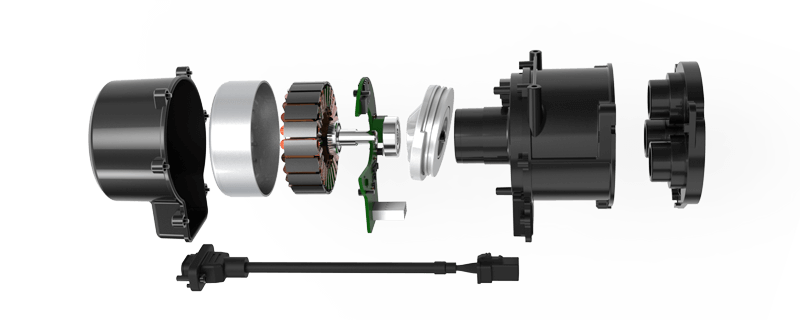
Let’s start with the most common type of servo motor you'll encounter— the standard proportional servo. They might look simple, but their internal wiring can be surprisingly nuanced. A typical servo motor generally features a three-wire configuration, each serving a specific purpose: power, ground, and control. These might be color-coded or labeled, depending on the manufacturer, so knowing the standard pinout makes a world of difference.
The first pin is almost always the power supply—commonly labeled as ‘Vcc’ or ‘+’. This pin provides the necessary voltage to operate the servo. Usually, the voltage range is between 4.8V and 6V, although high-torque or industrial servos may require different voltages. It's important to check datasheets or manufacturer's specs to supply the right voltage, as overvoltage can damage the internal electronics, while undervoltage can cause erratic behavior.
Adjacent to the power pin is the ground (GND), which acts as the reference point for the motor's electrical circuit. Connecting this securely ensures the servo has a common reference point and minimizes electrical noise, which can otherwise cause jittery movements or signal errors.
The third and arguably most intriguing pin is the control signal—often labeled as ‘PWM’ (Pulse Width Modulation). This pin receives the control signal from your microcontroller, dictating the position of the servo’s arm or shaft. It’s like giving the servo a gentle nudge in the right direction, based on the PWM pulse you send. Typically, a 1-2 millisecond pulse positions the servo from 0 to 180 degrees, offering fine control over the movement.
While these three pins are standard in most hobbyist servos, variations do exist, especially in specialized or industrial models. Some high-end servos include additional pins for feedback, temperature sensing, or serial communication. Always check the datasheet or product manual when working with non-standard servos to prevent miswiring.
Now, consider the physical aspect of the connectors. Many hobby servos come with a three-wire cable terminated with a simple connector—commonly a three-pin header that fits onto the control board. These connectors often follow a standard pattern: the signal (white or orange), ground (black or brown), and power (red). However, this isn’t a universal rule, so verifying each connection prevents potential mishaps.
Beyond the basics, understanding the internal wiring helps you troubleshoot issues effectively. If your servo isn’t responding, check the pin connections first. Loose wires, reversed polarity, or damaged connectors can all cause symptoms like jitter, non-response, or erratic movements. With a multimeter, you can verify that voltage is correctly supplied to the power pin, and that the ground is connected properly.
In robotics projects where multiple servos are involved, organizing and labeling each wire and pin is a smart habit. It saves time and confusion, especially when debugging or expanding your setup. Using color-coded wires or dedicated terminal blocks can keep things tidy and reliable.
Of course, safety and caution should always be part of your working principle. When wiring servos, power down your control board to prevent accidental shorts. Confirm your connections before powering on, and use appropriate current-limiting measures if necessary. While hobby servos usually draw small currents, high-torque models might demand more, so ensure your power supply can handle the load.
As you deepen your understanding of servo pinouts, you'll discover that flexibility and experimentation are key. Different applications may call for custom wiring or added features, but mastering the basics provides a strong foundation. Whether you’re designing a robotic arm, an automated vehicle, or a drone, knowing your servo’s pinout is step one toward smooth, responsive movements that bring your ideas to life.
Stay tuned for the second part, where we’ll explore more advanced wiring configurations, how to choose the right servo for different projects, and troubleshooting tips that can save you hours of frustration. Remember, every connection counts on your journey to mastering servo motors, and understanding the pinout is your first step in that exciting adventure.
Leveraging innovations in modular drive technology, Kpower integrates high-performance motors, precision reducers, and multi-protocol control systems to provide efficient and customized smart drive system solutions.
Update:2025-10-15
Contact Kpower's product specialist to recommend suitable motor or gearbox for your product.


